How I Use `@layer` in CSS to Organize Styles in My Project
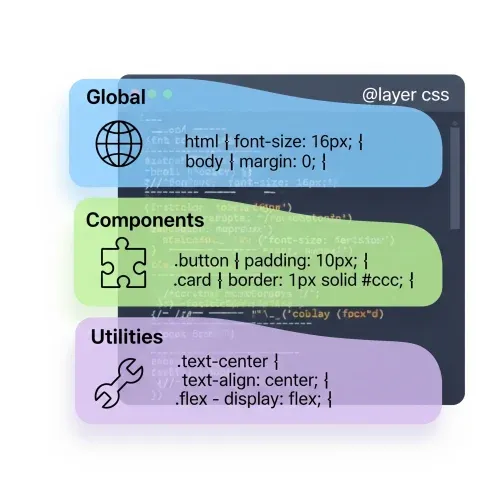
The @layer rule is one of the most useful innovations in modern CSS for organizing and controlling CSS in large projects. It allows you to define style layers, making it easier to manage priorities and avoid conflicts between components, utilities, and global styles.
In this post, I’ll explain how I’m using it on my website and why it can improve the maintainability of your stylesheets.
What is @layer in CSS?
@layer lets you group CSS rules into named layers. This way, you can decide which styles take priority over others, without relying solely on import order or specificity.
For example, you can have a layer for utilities, another for components, and another for global styles:
@layer global, utilities, components;

@layer utilities {
  .text-center { text-align: center; }
}

@layer components {
  .card { border-radius: 1rem; box-shadow: 0 2px 8px #0002; }
}

@layer global {
  body { font-family: system-ui, sans-serif; }
}
Here you can see how the first layer, global, defines styles that apply to the whole site, while utilities and components define more specific styles. If there are conflicts, the layer defined later takes priority.
Real Example: grid.css
In my project, I use @layer grid to encapsulate the logic of my grid system:
@layer grid {
  .content-grid {
    --padding-inline: 1rem;
    --content-max-width: 1140px;
    --breakout-max-width: 1440px;

    --breakout-size: calc(
      (var(--breakout-max-width) - var(--content-max-width)) / 2
    );
    display: grid;
    grid-template-columns:
      [full-width-start] minmax(var(--padding-inline), 1fr)
      [breakout-start] minmax(0, var(--breakout-size))
      [content-start] min(
        100% -
        (var(--padding-inline) * 2),
        var(--content-max-width)
      )
      [content-end]
      minmax(0, var(--breakout-size)) [breakout-end]
      minmax(var(--padding-inline), 1fr) [full-width-end];
  }

  .content-grid > :not(.breakout, .full-width),
  .full-width > :not(.breakout, .full-width) {
    grid-column: content;
  }

  .content-grid > .breakout {
    grid-column: breakout;
  }

  .content-grid > .full-width {
    grid-column: full-width;
    display: grid;
    grid-template-columns: inherit;
  }
}
This allows me to isolate the grid logic and ensure it doesn’t interfere with other styles in the project.
Important Points When Using @layer
When using @layer, you should usually have an initial definition of how these layers are ordered, for example:
@layer reset, base, components, utilities;This defines a clear cascade order:
reset: Reset styles to normalize CSS.base: Base styles like typography and colors.components: Styles for specific components.utilities: Utility styles that can be applied anywhere.
This ensures that styles are applied in the correct order, avoiding surprises.
And whenever you need to add styles to these layers, you can do so easily:
@layer utilities {
  .text-bold { font-weight: bold; }
}
Another important thing when using @layer is that you can import layers from external files, which allows you to keep your CSS modular and organized:
@import "reset.css" layer(reset);
@import "base.css" layer(base);
@import "components.css" layer(components);
@import "utilities.css" layer(utilities);
In addition, it’s important to understand how !important works with these layers. While @layer helps organize and control the cascade, styles marked with !important within a layer will still take precedence over normal styles, regardless of the layer they are in.
This is because !important increases the specificity of a rule, making it apply over other rules, even if they are in later layers.
An example of this would be:
@layer utilities {
  .text-bold { font-weight: bold !important; }
}
@layer components {
  .text-bold { font-weight: normal; }
}
In this case, .text-bold will always be bold due to !important, regardless of being in a later layer.
Advantages of Using @layer
- Organization: Groups related styles, making code easier to read and maintain.
- Clear priority: Explicitly defines which styles should be applied first, avoiding conflicts.
- Modularity: Allows you to split CSS into separate files by layer, improving project structure.
- Compatibility: Works well with modern CSS build tools and preprocessors.
- Collaboration: Enables multiple developers to work on different layers without interfering with each other.
- Improved maintainability: With well-defined layers, it’s easier to identify and modify specific styles without affecting the rest of the project.
Conclusion
Adopting @layer in your stylesheets helps you maintain order and clarity in modern projects. It’s especially useful when working with utilities, frameworks, or multiple collaborators. I encourage you to try it and see how it improves your CSS organization.
Have you used it yet? I’ll soon add a chat so you can share your experience!
If you have questions or want to share how you’re using it, leave a comment on this post on


Comments for LYRCSS